Balcony Plant Waterer Assembly and Testing
Tools
- Catch cup
- Measuring jug
9 steps
Lay out the parts and check compatibility
Keep the adapter unplugged while you lay out the parts. Use the 3D view to identify them; the simplified shapes do not establish how the real fittings or connectors attach.
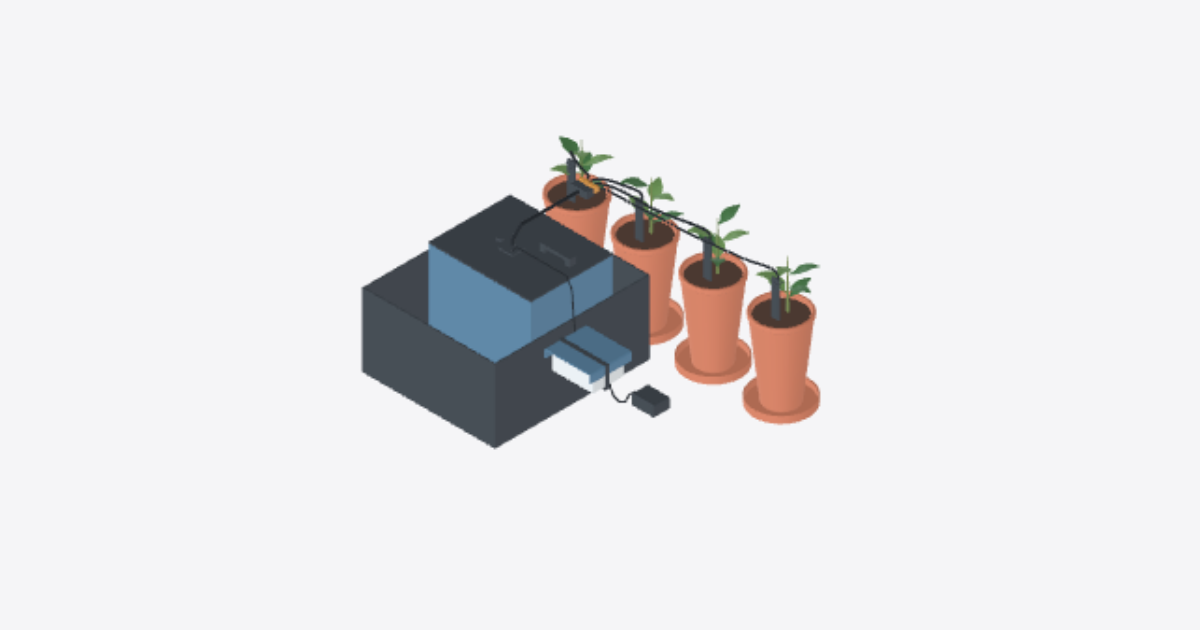
- Reservoir: A reservoir with its lid, hose-and-cable pass-through and sheltered vent; a secondary containment tray; and a submersible pump with its power cable.
- Four-pot watering: One pump feed hose, one four-way splitter, four flow valves, four branch hoses, four stakes and four ties. Set out four existing pots and four saucers.
- Controls and power: An interval timer, a weather-resistant timer box, two cable glands, a rain hood and strap, a low-voltage supply lead and an indoor 12 V adapter.
- Test tools: Set out four catch cups and a measuring jug. Use only the hand tools called for by the actual fittings and enclosure. Do not drill the lid, cut tubing or strip wires based on the model.
Before assembly, check that the tubing fits the pump, splitter and valves, and that the timer, pump and adapter are electrically compatible. Do not force fittings or substitute a power supply just because its plug fits.
Set the tray, reservoir and four pots in place
Set the secondary containment tray on a firm, level surface. Place the empty reservoir in it, where you can reach the lid to refill it. Put each of the four pots on its own saucer. Leave room to reach the flow valves and keep the eventual hose and cable runs out of walkways and away from doors.
Check that the surface can support the filled reservoir and that a spill or overflowing saucer cannot run off the balcony. Leave the reservoir empty for now.
Lower the pump into the open reservoir
Keep the adapter unplugged and the reservoir open. With the pump still accessible, attach the matching feed hose to the pump outlet. Lower the submersible pump into the empty reservoir and set it near the bottom with its intake clear. Support the pump by its body, not by its power cable. Leave the lid off for the next step.
Route the hose and cable and seat the lid
With power still disconnected, route the pump feed hose and pump power cable through the lid pass-through. Leave enough slack to seat the reservoir lid without pulling on the pump or pinching the hose or cable. Keep the sheltered vent clear. If the cable connector does not pass as intended, stop rather than cutting the cable or enlarging the opening.
Connect one watering line to each pot
- Connect the pump feed hose to the splitter inlet. Place the splitter where you can reach its valves and where the hoses will not pull on the connections.
- Fit the four flow valves and four branch hoses, one valve and hose per outlet. Follow any flow arrows on the actual valves. Match branches 1 through 4 to pots 1 through 4 and check each hose for kinks.
- Place the four stakes, one in each pot. Secure the hoses with the four ties without squeezing the tubing shut. Aim each outlet at the soil. Keep the outlet above the soil and above the reservoir’s highest water level to help prevent siphoning. If that layout is not possible, do not leave the setup unattended without verified siphon protection.
Set up the low-voltage timer with power disconnected
- Keep the indoor 12 V adapter unplugged, indoors and dry. Set the weather-resistant timer box in a sheltered position out of splashes and away from overflow. Keep it above standing water.
- Fit the interval timer in the box. Route the pump power cable through the pump cable gland and the low-voltage supply lead through the supply cable gland. Leave a downward loop outside each entry so water drips off before it reaches the box.
- Use the equipment markings and wiring instructions to identify the supply input and the pump output. Verify voltage, AC or DC, polarity where applicable, and that the adapter and timer can handle the pump’s current, including startup. Connect only the identified terminals or matching connectors. If you cannot verify them, stop and leave the adapter unplugged.
- Secure the glands without pinching the cables, close the box, and fit the rain hood and strap as intended for the hardware. The hood is not a substitute for a correctly sealed enclosure. Keep mains connections indoors.
Fill the reservoir and check for leaks with power off
With the adapter still unplugged, add clean water to the reservoir. Follow the actual reservoir’s fill limit and the pump’s minimum operating water level. Do not power the pump if the required submersion is unknown or cannot be maintained.
Check the reservoir, lid area and secondary containment tray for unexpected water. Keep the timer box and connections dry. If you find a leak, stop, drain as needed, fix the cause and repeat this check before applying power.
Test all four outlets while watching the system
- Set four catch cups under the four branch hose outlets, one per outlet, and keep the outlets at their normal height. Start with all four flow valves open enough to pass water. With dry hands, plug in the indoor adapter and run a short, supervised cycle using the timer’s test function if provided.
- Watch the pump feed hose, splitter, valves and hose joints for leaks. Make sure all four cups receive water. Stop the pump if a hose comes loose, a joint leaks, or the pump is no longer sufficiently submerged. Unplug before reseating a fitting.
- Use a measuring jug to compare the four collected volumes from the same cycle. Adjust each flow valve toward that pot’s watering needs and repeat the test. Equal volumes are not required if the pots need different amounts.
- After shutdown, watch each outlet. A little water may drain from the lines, but flow must stop. If it continues, leave the system off and correct the siphon risk before retesting.
Observe a scheduled cycle before leaving it unattended
Return the four branch hose outlets to their stakes. Set the interval timer using the tested delivery and each plant’s watering needs. Watch a complete scheduled cycle: the pump must start and stop on schedule, all four pots must receive water, flow must stop afterward, and no water may leak or overflow a saucer or the tray.
Leave it running on a schedule only if the electronics stay dry and the reservoir holds enough usable water for the planned absence without dropping below the pump’s minimum level. If a check fails or you cannot verify it, unplug the adapter and leave the system off.